Getting Started
Welcome to the Odido Developer Portal. This guide walks you through setting up
access and making your first successful request to an Odido REST API.
All APIs available through the portal are REST-based and use JSON over HTTPS.
Access Prerequisites
Access to the Odido Developer Portal and its APIs is restricted and
contract-based. Before you can authenticate or subscribe to any API, the
following prerequisites must be met:
- Active Odido customer relationship — Your organization must
have an active commercial relationship with Odido.
- API addendum / Developer Portal agreement — API access
requires a separate contractual agreement covering:
- Access to the Odido Developer Portal
- Applicable commercial and usage terms
Access to the portal is not provisioned automatically as part of standard
customer
contracts.
New to Odido APIs?
If you are evaluating our APIs, refer to the API landing page on odido.nl and
submit the lead form. Your request will be routed to the appropriate commercial
contact for follow-up.
Existing customer requesting API access
If your organization is already an Odido customer, contact your assigned account
manager or commercial contact to initiate the API access agreement and
provisioning process.
Once contractual access has been confirmed, a Developer Portal account can be
created and you may proceed with the technical onboarding steps below.
Before You Begin
Make sure the following applies to you:
- You are an Odido customer
- A Developer Portal account has been created for you (registration is per
environment)
- You have access to at least one API catalogue
- You have a development environment capable of making HTTPS requests
- You are familiar with basic REST concepts (HTTP methods, headers, JSON)
Environments
The Odido Developer Portal is available in multiple environments. Registration
and
credentials are separate per environment and are not shared.
- Dev: https://developer-dev.odido.nl/
- Agile: https://developer-agile.odido.nl/
- Staging: https://developer-staging.odido.nl/
- Production: https://developer.odido.nl/
Access to Production is separate from non-production environments.
Access Model
Access to APIs follows this structure:
Account → Catalogue → Product → API → Endpoints
- Your account provides access to one or more catalogues
- A catalogue contains products
- A product contains one or more APIs
- An API contains multiple endpoints
To use an API, you must subscribe to an API plan within the portal. After
subscribing, you can create an application to obtain credentials. One
application
can access multiple APIs, depending on the subscriptions linked to it.
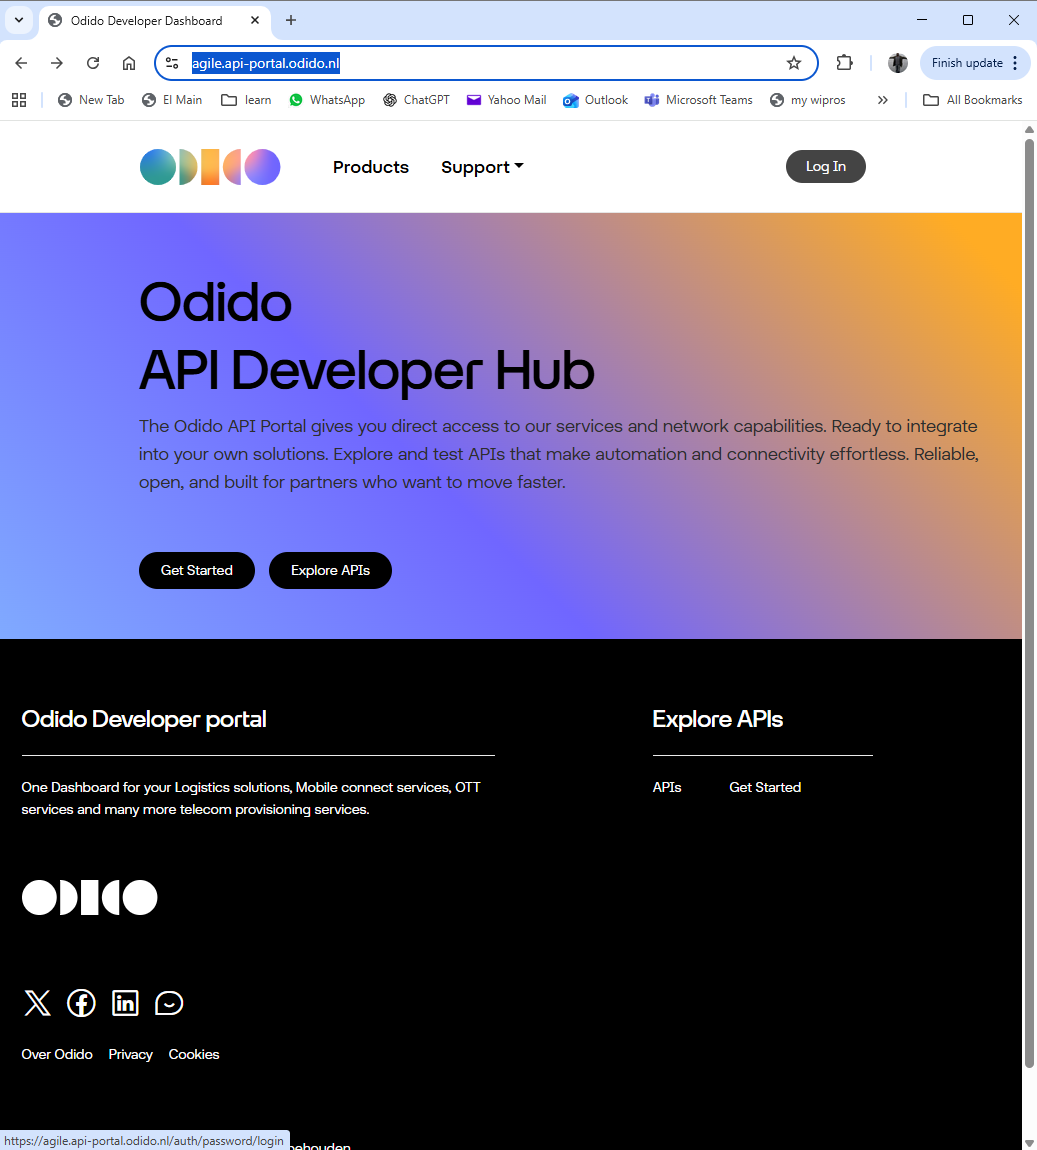
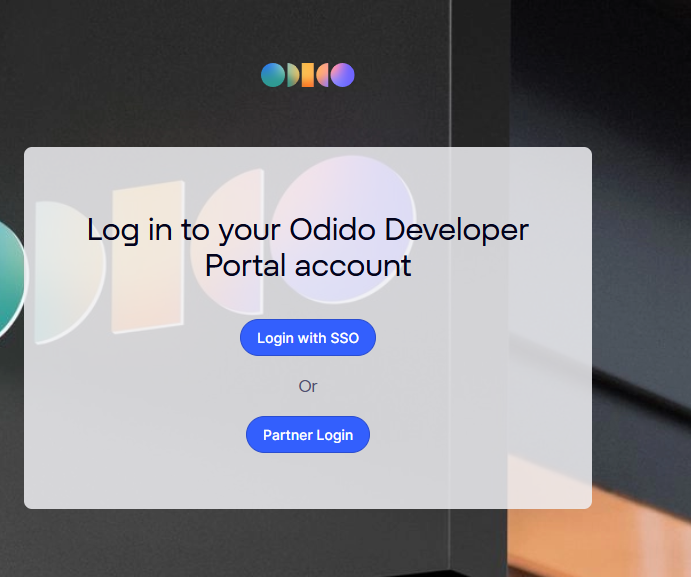
Step 1 — Log In
Log in to the appropriate Developer Portal environment.
- External users log in using 2FA
- Odido employees log in via SSO
If this is your first login, you will be prompted to configure your 2FA method.
Step 2 — Subscribe to an API
- Navigate to the relevant catalogue
- Select the product
- Choose the API
- Subscribe to an available API plan
Once subscribed, you can proceed to create your application.
Step 3 — Create an Application
To call an API, you must create an application in the portal. When creating an
application:
- A Client ID is generated automatically
- A Client Secret is generated automatically
Important:
- The Client Secret cannot be regenerated
- If the secret is compromised, the application must be revoked and a new
application must be created
- A user can create multiple applications
Store your credentials securely.
Step 4 — Obtain an Access Token
All Odido APIs use OAuth2 Client Credentials flow. The token request body must be sent using the application/x-www-form-urlencoded content type.
Token endpoint (per environment):
- Dev:
https://connect-dev.odido.nl/realms/tyk-dev-portal/protocol/openid-connect/token
- Agile:
https://connect-agile.odido.nl/realms/tyk-dev-portal/protocol/openid-connect/token
- Staging:
https://connect-staging.odido.nl/realms/tyk-dev-portal/protocol/openid-connect/token
- Production:
https://connect.odido.nl/realms/tyk-dev-portal/protocol/openid-connect/token
Token request example:
curl -X POST "https://connect-staging.odido.nl/realms/tyk-dev-portal/protocol/openid-connect/token" \
  -H "Content-Type: application/x-www-form-urlencoded" \
  -d "grant_type=client_credentials" \
  -d "client_id=YOUR_CLIENT_ID" \
  -d "client_secret=YOUR_CLIENT_SECRET" \
  -d "scope=YOUR_APPLICATION_SCOPES"
The scope parameter in an OAuth 2.0 request specifies the permissions the application is requesting. YOUR_APPLICATION_SCOPES is a placeholder for one or more scope names required to access specific resources or perform certain actions. You can find the applicable scopes in your application overview under Client type details → Scope permission. If multiple scopes apply, separate them with spaces—not commas.
The response contains an access token.
- The token type is Bearer
- Token validity: 300 seconds (5 minutes)
Step 5 — Make Your First API Request
Once you have obtained an access token, include it in the
Authorization header of your request.
Example:
curl -X GET "https://api-base-url/example-endpoint" \
  -H "Authorization: Bearer YOUR_ACCESS_TOKEN" \
  -H "Accept: application/json"
All APIs:
- Use HTTPS
- Return JSON responses
- Use standard HTTP status codes
Refer to the API Reference for endpoint-specific details.
Rate Limits
Rate limits may apply depending on the API plan you are subscribed to. For
example, some plans may allow a defined number of requests per second. Daily or
monthly quotas may vary depending on the API plan configuration.
Check the specific API plan details in the portal for applicable limits.
Next Steps
After successfully making your first call:
- Explore additional endpoints in the API Reference
- Review authentication and security best practices
- Monitor your usage in the portal
- Contact support if you encounter issues
You are now ready to build with Odido REST APIs.
Browsing Available API Products
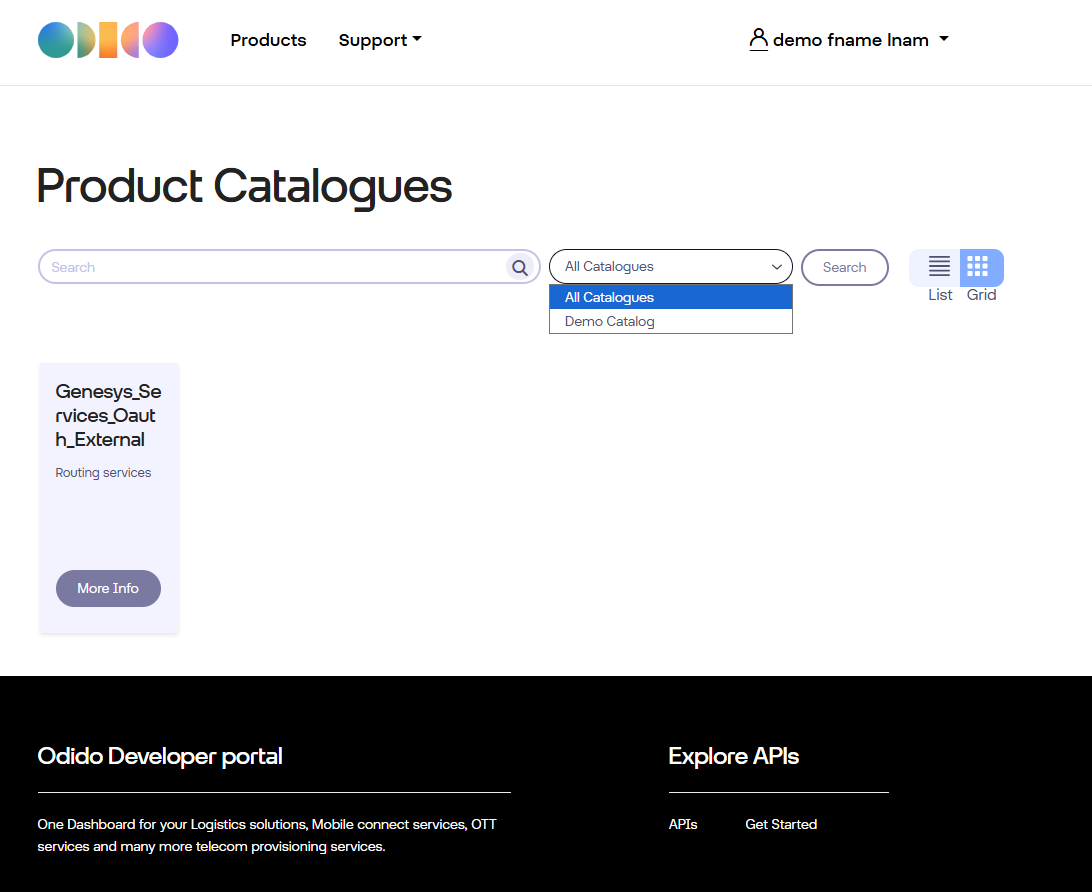
Step 1 — Click "Explore APIs"
On the homepage, click Explore APIs to browse the available API
catalog.
Step 2 — View API Product Details
For example, click More Info on:
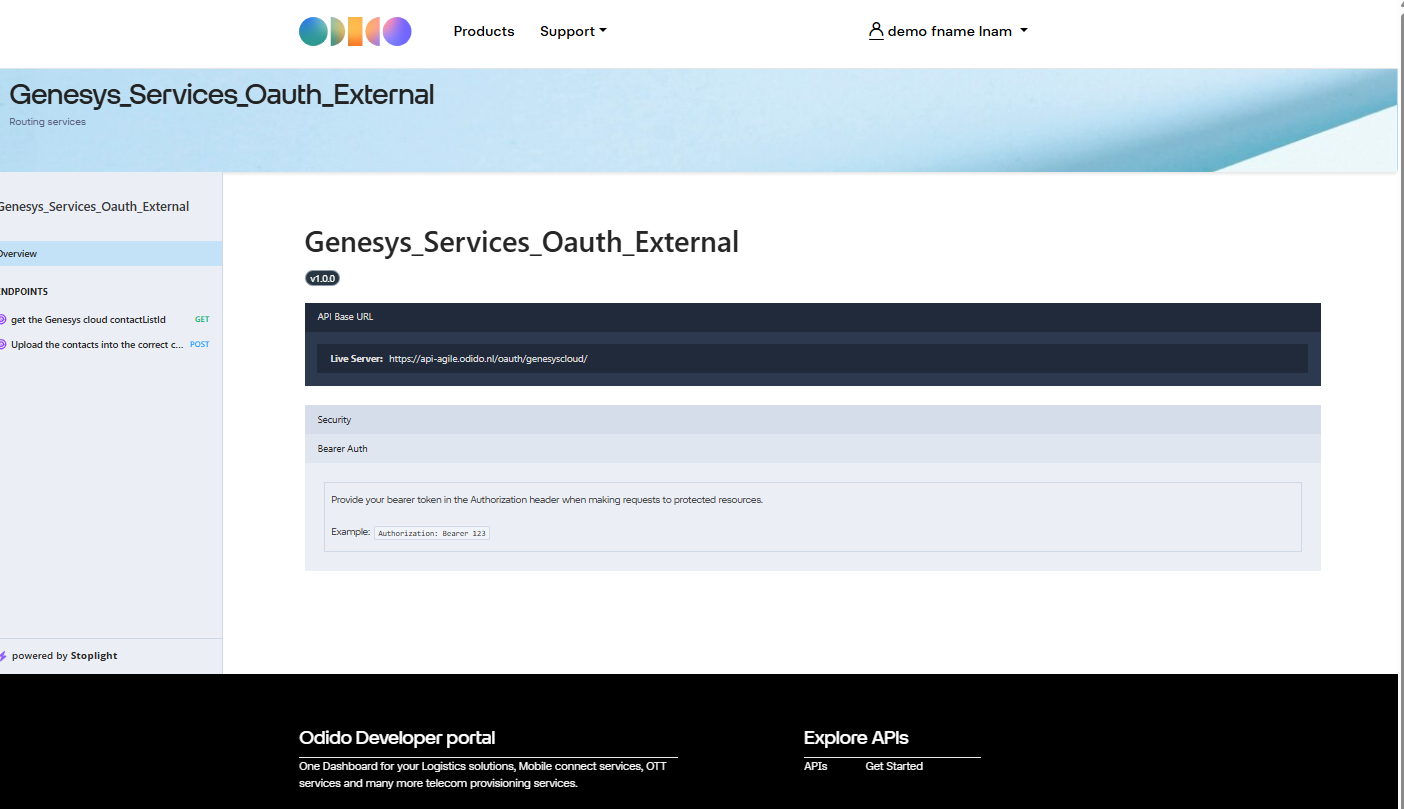
👉 Genesys_Services_Oauth_External
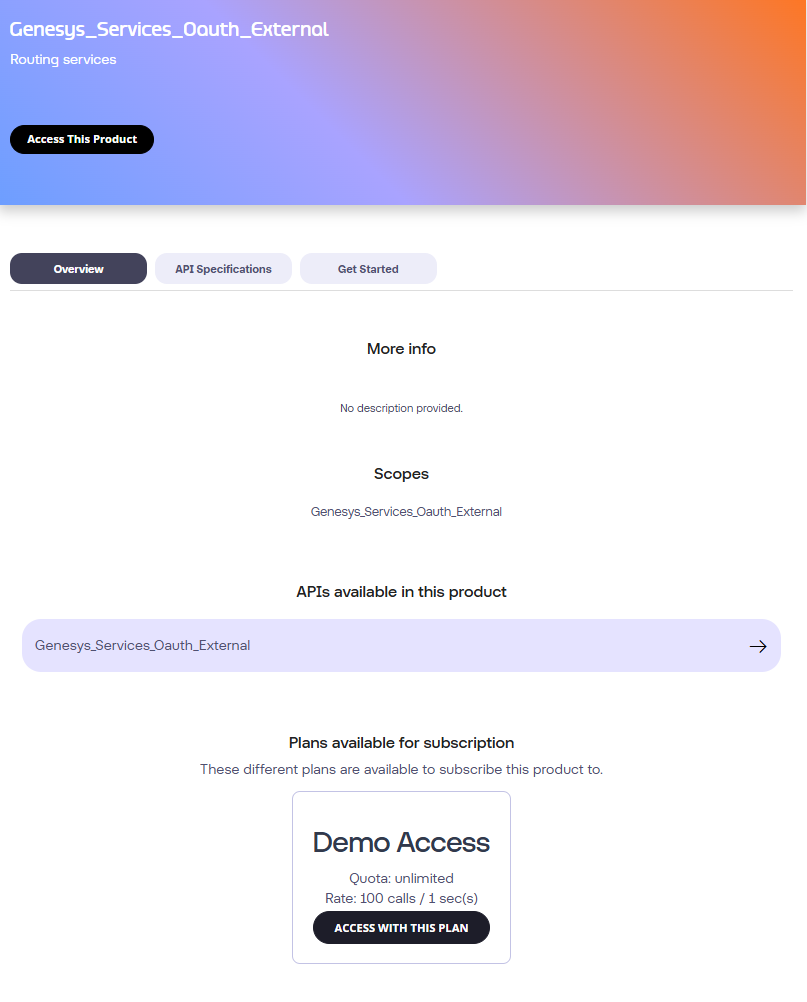
This displays product description, OAS link and available subscription plans.
Click on the -> next to the API name to view the OAS documentation
Subscribing to an API Plan
Step 1 — Click "Access with this plan"
Select the plan associated with the product. This adds the API Product to your
Cart.
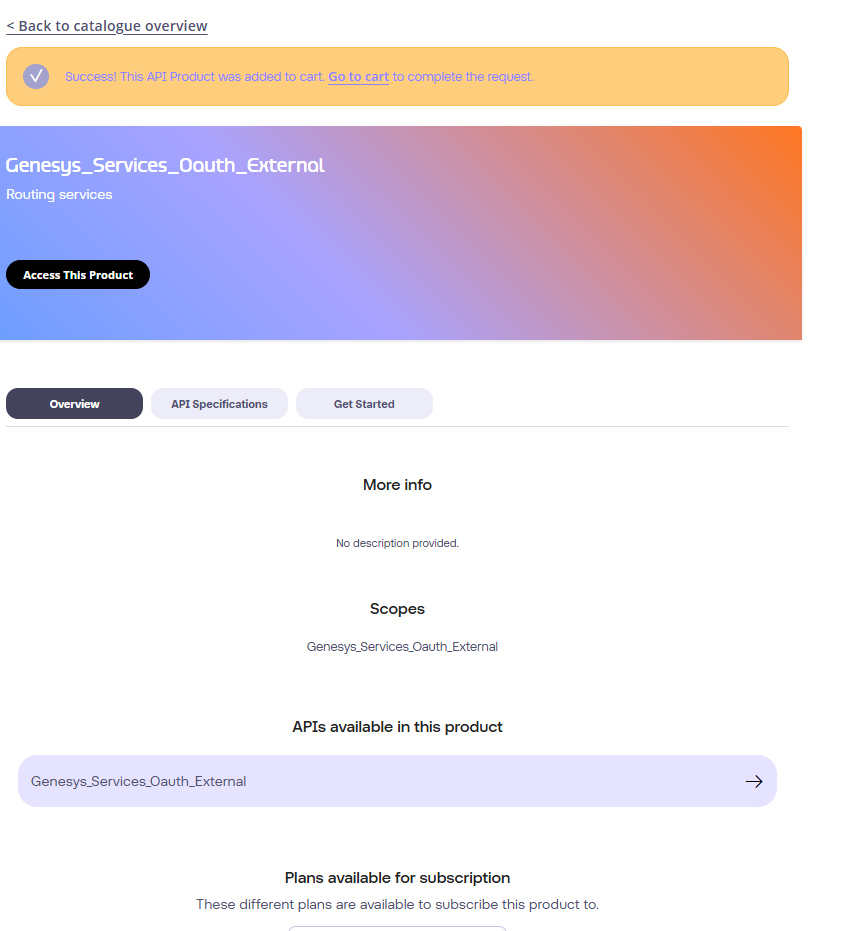
Step 2 — Proceed to Cart
Click Go to Cart.
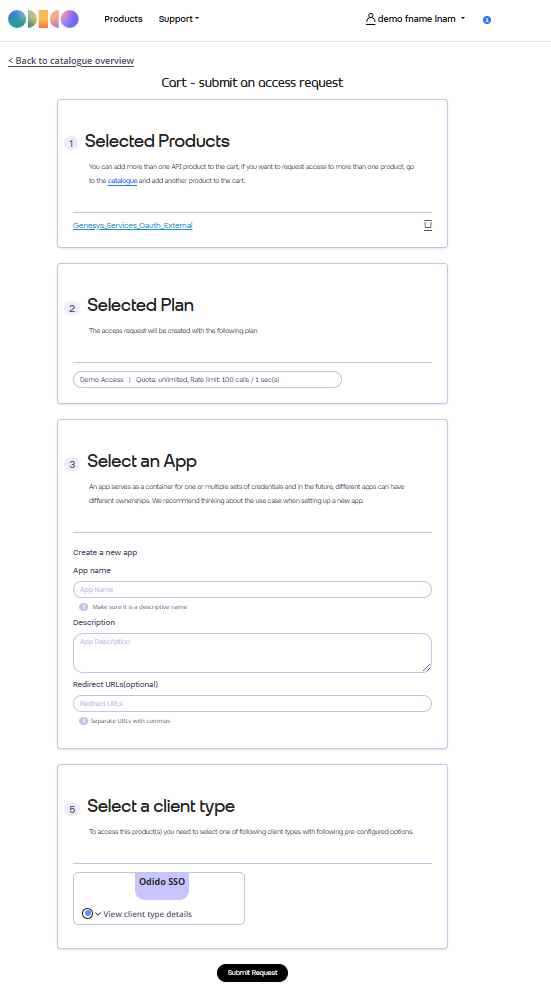
Step 3 — Create a New Application
In the Select an App section:
- Choose Create a new App
- Provide:
- App Name
- Description
- Redirect URL (any value is acceptable but must not be empty)
-
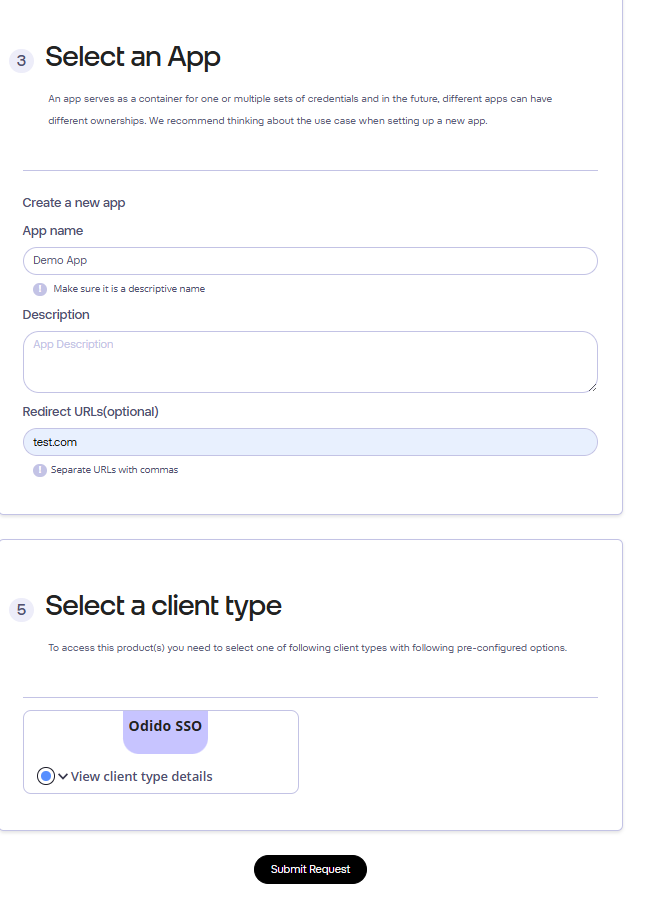
- Submit your request.
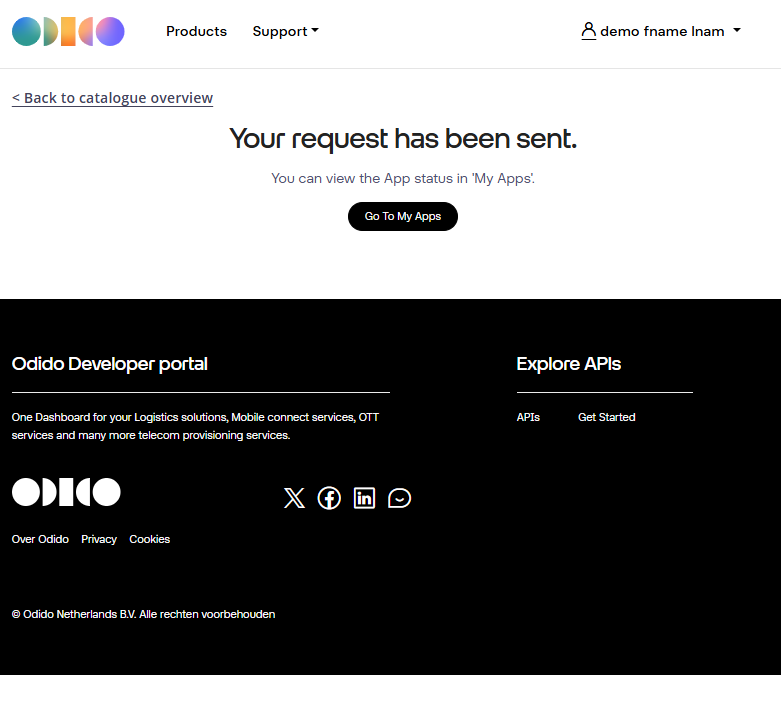
Viewing Your Application
and
Credentials
Step 4 — Go to "My Apps"
Click:
👉 Go to My Apps
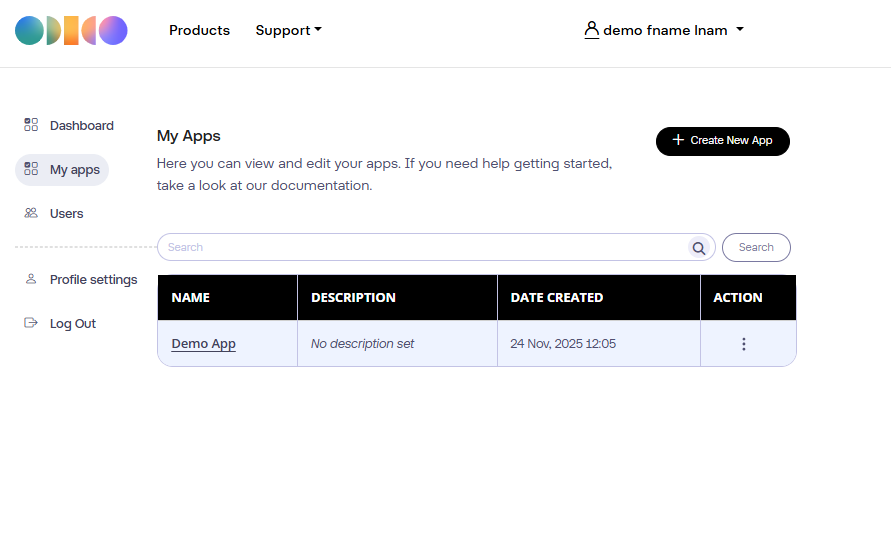
Your newly created application will appear in the list.
Step 5 — Open the App Details
Click the application name to view:
- Client ID
- Client Secret
- Assigned API Products
These credentials will be used for OAuth authentication.
Obtaining an OAuth Token
Use the retrieved credentials to request a token.
Token Request Example (Client Credentials Flow)
curl --location 'https://connect-agile.odido.nl/realms/tyk-dev-portal/protocol/openid-connect/token' \
  --header 'Content-Type: application/x-www-form-urlencoded' \
  --data-urlencode 'client_id=xxxxxxx' \
  --data-urlencode 'client_secret=xxxxxxxxxx' \
  --data-urlencode 'scope=Genesys_Services_Oauth_External demoplan' \
  --data-urlencode 'grant_type=client_credentials'
This returns a JSON payload containing:
- access_token
- expires_in
- token_type
Calling the Actual API
With the obtained token, call the target API:
API Call Example
curl --location 'https://api-agile.odido.nl/oauth/genesyscloud/api/v2/outbound/contactlists' \
  --header 'x-auth-token: Bearer xxxxxxx'
Replace:
- xxxxx with your access token
- Client credentials with your generated values
Support
If you have any questions or encounter issues, feel free to reach out to your
assigned
ODIDO point of
contact.
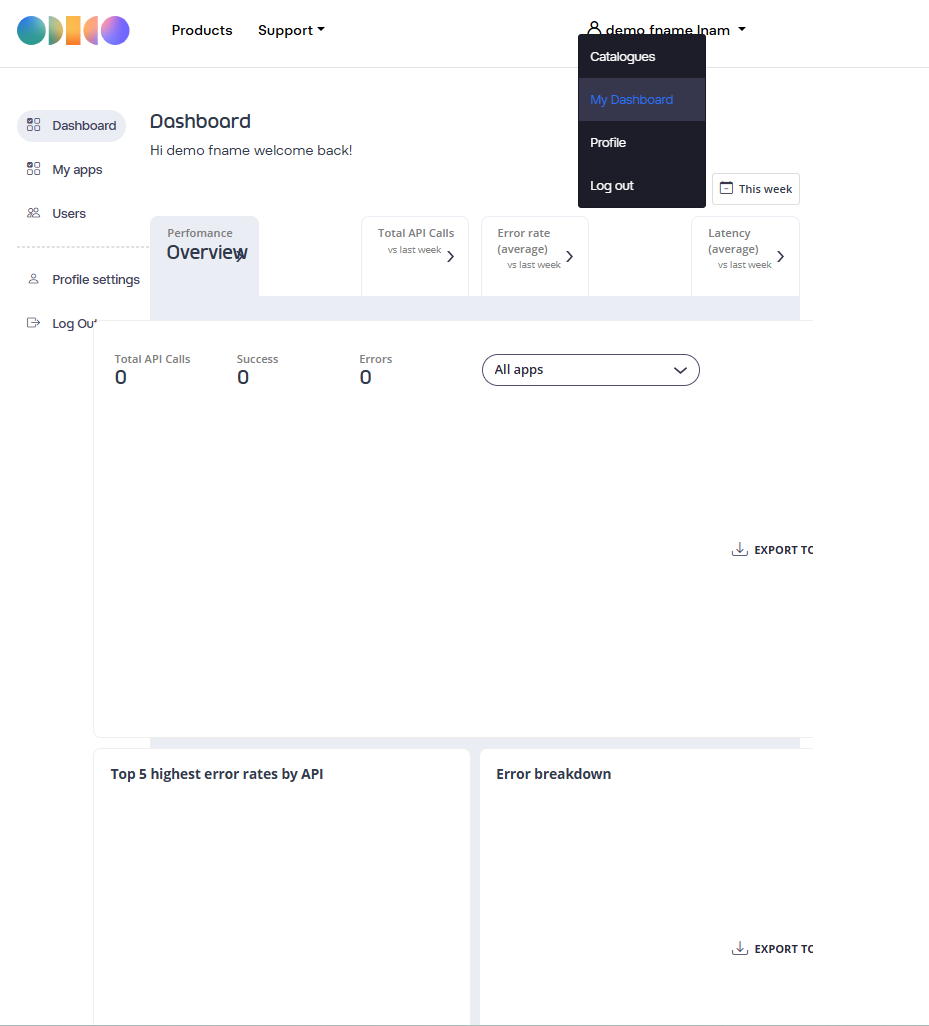
Viewing analytics for usage, errors,
and
performance
Access the API usage dashboard from My Dashboard link as shown below
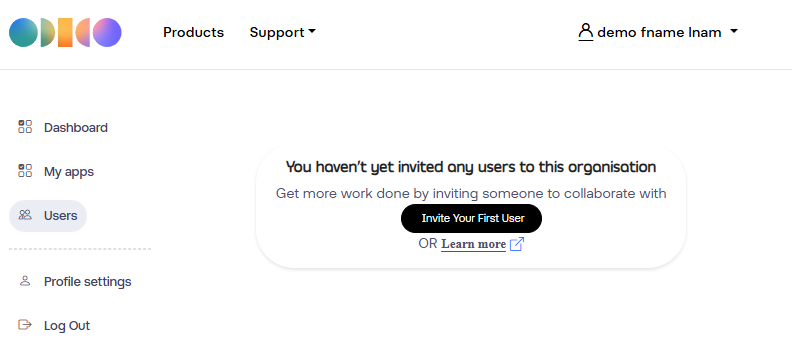
Invite more organization users
Access the Users - from My Dashboard link as shown below
Click on the Invite Your First user, fill in the form, assign the right role for
the
User. An invite email
will be sent to the user and he follows the same registration process as
described
in
the earlier session.
How to access the API Product(s) ?
Go to My Apps under the My Dashboard from the profile menu.
- You will see all apps created by your organization.
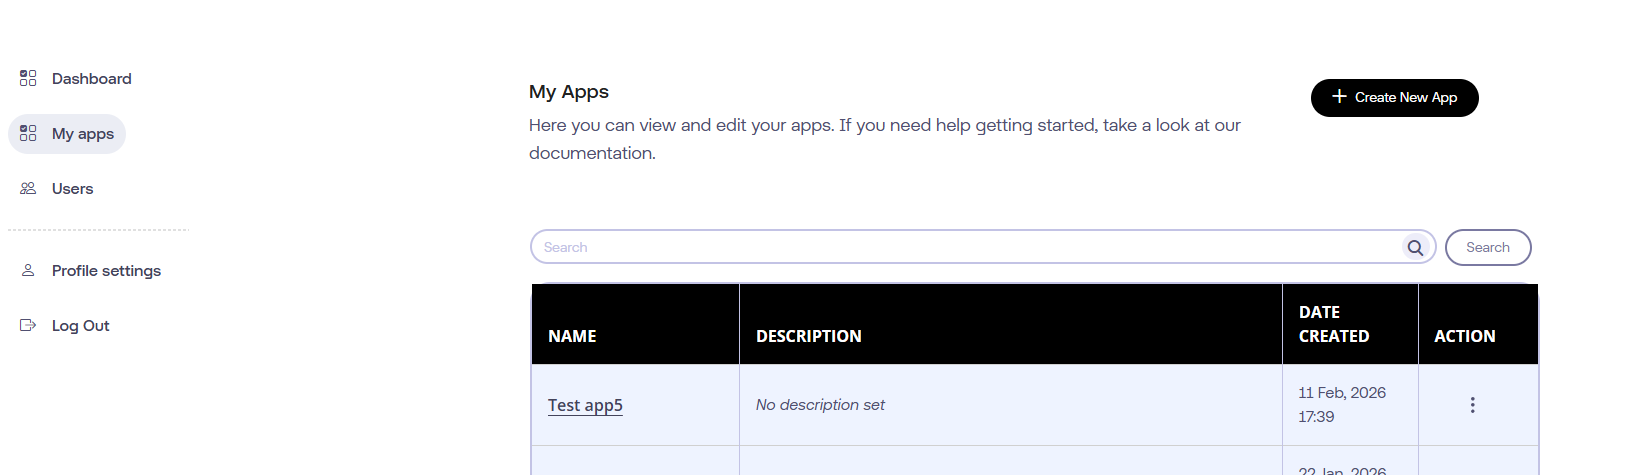
- Click the App name you want to use for API access.
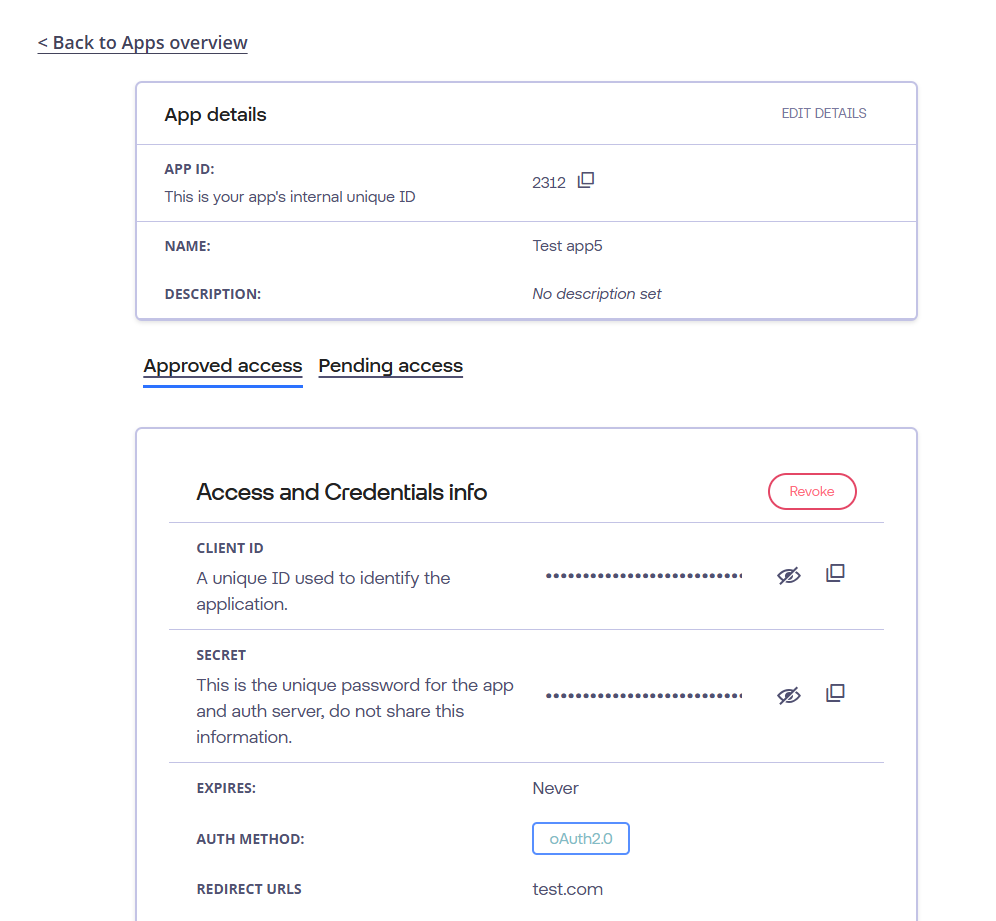
-
Inside App Details you can find the access request status.
-
For the Approved access request you can see the Client Credentials under
Access and Credentials Info with below details:
- Client ID
- Client Secret
- Authentication Method (OAuth2)
- Redirect URLs
- Expiry info
- Under View Client Type Information:
- Grant Types (example: client_credentials)
- Token Endpoint Auth Method (example: client_secret_basic)
- Scope Permissions
Token endpoint (per environment):
- Dev:
https://connect-dev.odido.nl/realms/tyk-dev-portal/protocol/openid-connect/token
- Agile:
https://connect-agile.odido.nl/realms/tyk-dev-portal/protocol/openid-connect/token
- Staging:
https://connect-staging.odido.nl/realms/tyk-dev-portal/protocol/openid-connect/token
- Production:
https://connect.odido.nl/realms/tyk-dev-portal/protocol/openid-connect/token
Sample CURL Request
curl -X POST "Token Endpoint" \
-H "Content-Type: application/x-www-form-urlencoded" \
--data-urlencode "client_id=<client-id>" \
--data-urlencode "client_secret=<client-secret>" \
--data-urlencode "scope=<scope permissions>" \
--data-urlencode "grant_type=client_credentials"
Sample Response
{
"access_token":"eyJhbGciOi......",
"expires_in":300,
"refresh_expires_in":0,
"token_type":"Bearer",
"scope":"scope1 scope2"
}
API Call Example
curl -X GET <api_base_url>/endpoint \
-H "Authorization: Bearer <access_token>"
How to create and consume stubbed endpoints?
API Mock Stubbing Guide
This guide explains how to use mock stubs when calling APIs to simulate
different responses without hitting real backend services.
Mock stubbing is available in non-production environments only
(dev, agile, staging).
Quick Start
Enable mock responses by adding these headers to your API request:
X-Mock-Response: true
X-Mock-Path: /orders
X-Mock-Scenario: success
Required Headers
X-Mock-Response
- Required: Yes (to enable mocking)
- Value:
true
- Description: Activates the mock stubbing middleware
X-Mock-Path
- Required: Yes
- Value: The API path pattern (e.g.,
/orders,
/orders/{id}, /users/{id}/profile)
- Description: Specifies which stub file to use. Use
{id} as a placeholder for dynamic path segments
X-Mock-Scenario
- Required: No
- Default:
success
- Value: The scenario name (e.g.,
success,
not-found, error, timeout)
- Description: Determines which stub variant to use for
testing different cases
Path Patterns
Static Paths
For endpoints without dynamic parameters:
X-Mock-Path: /orders
X-Mock-Path: /users/settings
Dynamic Paths
Use {id} as a placeholder for IDs or dynamic segments:
X-Mock-Path: /orders/{id}
X-Mock-Path: /users/{id}/profile
X-Mock-Path: /companies/{id}/employees/{id}
Note: Leading and trailing slashes are optional - all these
work the same:
orders/{id}/orders/{id}/orders/{id}/
Common Scenarios
Success Response
curl -X GET https://api.example.com/orders/123 \
  -H "X-Mock-Response: true" \
  -H "X-Mock-Path: /orders/{id}" \
  -H "X-Mock-Scenario: success"
Not Found (404)
curl -X GET https://api.example.com/orders/999 \
  -H "X-Mock-Response: true" \
  -H "X-Mock-Path: /orders/{id}" \
  -H "X-Mock-Scenario: not-found"
Server Error (500)
curl -X POST https://api.example.com/orders \
  -H "X-Mock-Response: true" \
  -H "X-Mock-Path: /orders" \
  -H "X-Mock-Scenario: server-error" \
  -H "Content-Type: application/json" \
  -d '{"product": "widget"}'
Validation Error
curl -X POST https://api.example.com/orders \
  -H "X-Mock-Response: true" \
  -H "X-Mock-Path: /orders" \
  -H "X-Mock-Scenario: validation-error" \
  -H "Content-Type: application/json" \
  -d '{"product": ""}'
Dynamic Templating
Stub responses can include values pulled from your request using
{{ ... }} syntax, so the response echoes back data you sent.
Available Template Variables
| Variable |
Description |
Example |
{{ request.method}} |
HTTP method |
GET, POST |
{{ request.route}} |
Mock path pattern |
/orders/{id} |
{{ request.path.id}} |
Path parameter value |
123 from /orders/123 |
{{ request.headers.X-User-Id}} |
Request header value |
Header: X-User-Id: user123 |
{{ request.query.page}} |
Query parameter |
2 from ?page=2 |
{{ request.body.productId}} |
Request body field |
From JSON body |
Complete Examples
Example 1: Get Order by ID
Request:
curl -X GET https://api.example.com/orders/12345 \
  -H "X-Mock-Response: true" \
  -H "X-Mock-Path: /orders/{id}" \
  -H "X-Mock-Scenario: success"
Response:
{
  "id": "12345",
  "status": "shipped",
  "items": [
    {
      "product": "Widget",
      "quantity": 2,
      "price": 29.99
    }
  ],
  "total": 59.98
}
Example 2: Create Order
Request:
curl -X POST https://api.example.com/orders \
  -H "X-Mock-Response: true" \
  -H "X-Mock-Path: /orders" \
  -H "X-Mock-Scenario: success" \
  -H "Content-Type: application/json" \
  -d '{
    "product": "Gadget",
    "quantity": 3,
    "userId": "user-456"
  }'
Response: (HTTP 201)
{
  "id": "new-order-789",
  "product": "Gadget",
  "quantity": "3",
  "userId": "user-456",
  "status": "pending",
  "createdAt": "2026-03-19T10:30:00Z"
}
Example 3: Not Found Error
Request:
curl -X GET https://api.example.com/orders/99999 \
  -H "X-Mock-Response: true" \
  -H "X-Mock-Path: /orders/{id}" \
  -H "X-Mock-Scenario: not-found"
Response: (HTTP 404)
{
  "error": "Order not found",
  "orderId": "99999",
  "message": "No order exists with ID 99999"
}
Testing Different Scenarios
Common scenarios you can test:
| Scenario |
Purpose |
Typical Status |
success |
Happy path |
200, 201 |
not-found |
Resource doesn't exist |
404 |
unauthorized |
Authentication failed |
401 |
forbidden |
Permission denied |
403 |
validation-error |
Invalid input |
400 |
conflict |
Duplicate or conflict |
409 |
server-error |
Backend failure |
500 |
service-unavailable |
Backend down |
503 |
timeout |
Slow response |
504 |
rate-limited |
Too many requests |
429 |
Error Responses
When Mock Headers Are Missing
Missing X-Mock-Path:
{
  "error": "X-Mock-Path header is required",
  "example": "X-Mock-Path: /orders"
}
Status: 400 Bad Request
When Stub Not Found
{
  "error": "Failed to fetch mock stub",
  "reason": "HTTP 404"
}
Status: 502 Bad Gateway
Tips & Best Practices
- Use descriptive scenario names - Make it clear what
behavior you're testing
- Leverage
{id} placeholders - Reuse stubs for
any ID value
- Test error cases - Don't just test happy paths
- Consistent stub structure - Use the same patterns across
your team
- Document custom scenarios - Share available scenarios
with your team
Troubleshooting
Q: Mock headers aren't working
- Ensure
X-Mock-Response: true is set (case-sensitive headers)
- Verify
X-Mock-Path is provided
- Check that mock stubbing is enabled for this API and environment
Q: Getting 404 errors
- Verify a stub exists for this path, method, and scenario
- Check with your API team whether the scenario name is correct
Q: Template variables showing as empty
- Ensure you're using the correct template syntax:
{{request.path.id}}
- Check that path parameters match the pattern (e.g.,
{id} in
path)
- Verify request body is valid JSON for body templates
Q: How do I find available scenarios?
- Check with your API team for the scenarios available for that endpoint
- Common scenarios are usually:
success, not-found,
error
- To request a new scenario, ask your API team to add it